
Quick Start
Start scanning receipts and invoices with Taggun's API in a few minutes — sign up, get your API key, and make your first scan.
All you need is an email address.
1. Sign Up
Create your Taggun account at taggun.io/sign-up. Choose a self-service plan when you sign up. The first 30 days or first 1,000 scans, whichever comes first, are free. When either limit is reached, the selected plan becomes paid and billing starts.
2. Get Your API Key
After signing up, your API key is generated automatically and sent to your registered email address — typically instantly, occasionally within a few minutes. If you don't see it, check your spam folder.
You can also find your key any time in your account dashboard at taggun.io/account.
Keep your API key secretYour key is the gateway to your account. Store it in environment variables or a secrets manager — never in client-side code or version control. If a key is exposed, contact [email protected] to rotate it.
There is no separate sandbox environment — your key calls the same production API whether you're testing or in production, so treat every request as live.
3. Upload Your First Receipt
Use Upload File (simple) to send a receipt or invoice file and receive a compact JSON response.
Accepted formats and current request requirements: Document Types & File Requirements.
curl --request POST \
     --url https://api.taggun.io/api/receipt/v1/simple/file \
     --header 'accept: application/json' \
     --header 'apikey: YOUR_API_KEY' \
     --header 'content-type: multipart/form-data' \
     --form extractTime=false \
     --form refresh=false \
     --form file='@example-file.png'
Replace YOUR_API_KEY with your API key and update @example-file.png to the path of the receipt or invoice file you want to scan.
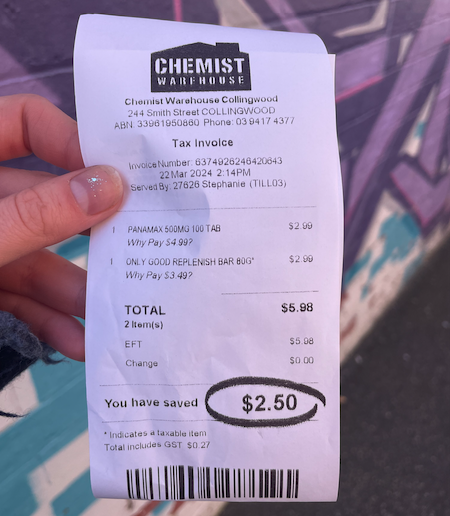
4. Read the JSON Response
The simple endpoint returns the most common receipt fields:
{
  "totalAmount": {
    "data": 5.98,
    "confidenceLevel": 0.92
  },
  "taxAmount": {
    "data": 0.27,
    "confidenceLevel": 0.92
  },
  "confidenceLevel": 0.898,
  "date": {
    "data": "2024-03-22T12:00:00.000Z",
    "confidenceLevel": 0.92
  },
  "merchantName": {
    "data": "Chemist Warehouse",
    "confidenceLevel": 0.81
  }
}
For how to interpret the response, see Understanding Your Results.
Where Next
- Plan your first 30 days — Your First 30 Days
- Test the API on your own documents — Test With Your Own Receipts
- Inspect the broader extraction response — Upload File (verbose)
- See what Taggun can extract — Data Fields That Taggun Extracts
- Validate receipts against campaign rules — Receipt Validation Fundamentals
Updated 3 months ago