
End-User Capture Guidance
Best practices for helping users submit legible, complete receipt images through clear instructions, examples, and client-side feedback.
Clear capture guidance helps users submit legible, complete images. This page is for the team building the submission UI.
Capture Guidelines to Give Your Users
- Show the whole receipt — merchant name, date, totals, and line items if your workflow needs product data.
- Fill most of the frame with the receipt, so the smallest text you need is still legible after upload or compression.
- Photograph flat-on, in focus, with as little angle and blur as possible.
- Avoid glare, shadows, and background text.
- Use undamaged receipts where possible.
- Where a digital original exists (an emailed PDF), submit that instead of a photo of a screen.
Show good vs bad examples: a well-lit, fully visible receipt alongside the common mistakes (glare, shadows, partial images, background clutter). A side-by-side comparison works better than written rules alone.
Visual example: clearer and harder-to-read captures
The top-row examples show background text competing with the receipt and a steep angle distorting its printed lines. The bottom-row examples keep the full receipt visible, fill more of the frame, and hold the camera closer to straight-on.
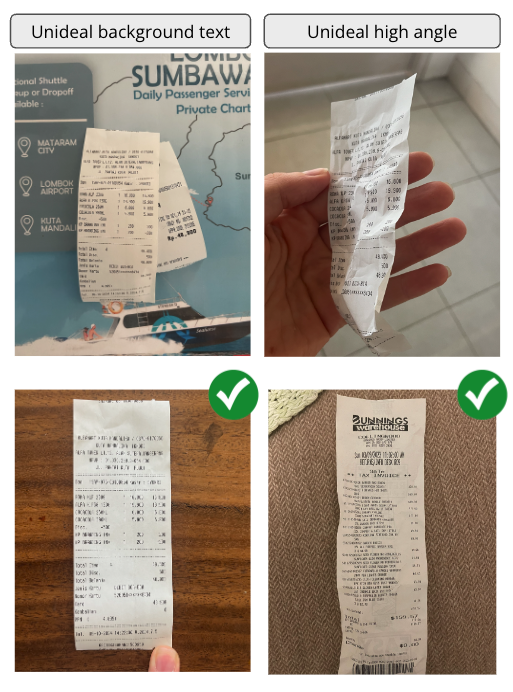
Illustrative comparison of harder-to-read and clearer receipt captures.
Use short, actionable labels such as Avoid and Better in your upload flow. This comparison is about capture quality; it is not a fraud assessment or a guarantee of extraction results.
File Size Guidance
Most users will submit the photo their phone gives them, so do not ask for an exact file size. If your app compresses images before upload, around 1 MB is a useful target for many receipt photos, as long as the text remains readable. Avoid heavy compression that blurs small print.
Use a supported file type; see Document Types & File Requirements. Format usually matters less than readability: converting a JPEG to PNG will not add detail or improve accuracy.
Design the Flow for First-Pass Success
- Capture in-app with the camera where you can. Any image source works — Taggun just receives the file — but in-app capture gives you more control over quality guidance.
- Check quality before submission. Client-side checks can identify blurry or poorly framed images before upload.
- Interpret extraction fields before building retake logic. See Understanding Your Results.
- Blurry image? Tell the user. Fraud flag? Don't. A quality problem is something a genuine user can fix; a specific fraud reason only teaches fraudsters what to work around. See Fraud Detection Best Practices.
Tell Users What's Accepted
- List the receipt types your campaign or workflow accepts, and any limitations. For what Taggun itself accepts, see Document Types & File Requirements.
- Explain how receipt data is used and protected, and link your privacy policy — it improves submission rates and trust. For what you can tell users about Taggun's handling, see Security, Privacy & Data Residency.
Need something not covered here? Contact [email protected] — see Contacting Support.
Updated 3 months ago